
Do you want to enliven your classroom lectures? Presentation software like Microsoft PowerPoint can transform lectures into easy-to-use, computer-based presentations with colorful images, simple animations, and sound. We discuss its use in an undergraduate research methods class, describe options for producing and finding visual images, and alert you to the potential payoffs and drawbacks of computer-based presentations. Finally, we offer a list of tips to help you avoid common pitfalls.
Encouraged by the resource specialist (Winifred Anderson) at the Teaching Resources Center on my campus, I (Barbara Sommer) used PowerPoint to enliven the lecture component of a 250-student lower division research methods class at the University of California, Davis. The software enabled me to transform my lecture material into a more visual format, adding a diverse set of more effective illustrations, and even incorporating sound. The start-up time was considerable; the rewards were worth it.
I tested the idea by first changing only two lectures to the new computer-based format, and then increased their number each term as my skill and experience increased. I discovered that shifting between computer-based and traditional lecture formats helps keep class sessions from becoming routine, so I continue to use the traditional lecture-and-discussion format for some topics, particularly those that benefit from considerable interaction between instructor and students.
Production Considerations: Concepts, Images, and Instructional Contexts
"Research Methods" is a highly conceptual subject that is difficult to make captivating and stimulating for students. A major challenge has been to find or construct visual images that capture the ideas embodied within this linear, word-based tradition of academic work and thought. The process, however, of having to find a way to effectively represent each concept visually, has helped me clarify its role in the larger context of the course better than ever before. For example, I have moved from simple, sequential lists of points, to images representing the elements in context. The visual lectures not only have more impact, but more clarity and information as well. Now, when I have a choice between text and an illustration for a concept, I use the illustration because I can elaborate on the concept verbally while the students are absorbing a visual version of it. An important caveat: the image must characterize the point being made if it is to promote learning and recall, not distraction.
When I want to add more "zip" to an illustration (e.g. when the class is right after lunch or is two hours long), I stage more dramatic transitions by adding sound or having the added elements scoot across the screen into place.
Examples
One of the most useful functions of presentation software is the capacity to "build," or add components to a slide, visually showing the development of an idea or concept, at precisely the appropriate moment in the lecture. This one, for example, illustrates the advantages of doing archival research.

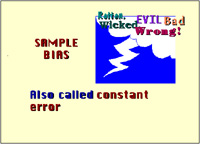
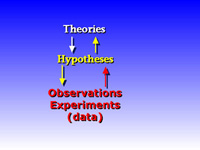
To demonstrate sampling, I select a subset from an on-screen population, one by one. The building feature is especially wonderful for creating graphs, showing how each data point is plotted, and continuing to the final set of lines, bars, or whatever one chooses. I use text and arrows to illustrate the relationship between theories, hypotheses, and data, highlighting words in distinguishing colors, and adding each level as I develop the relationship verbally.
For examples of stimulus materials, I use standardized test items from outdated forms to avoiding copyright infringement and the problem of exposing students to items on which they might be tested in some other setting.
Finding images
The PowerPoint package includes drawing capability and clip art images. Pictures, photos, and other images are easily imported from commercial collections, as are figures and graphs created in Excel or Word. For $40 you can obtain a CD-ROM with 40,000 images on it. Scanning material from books and magazines requires additional equipment, but the resulting files are easily converted into PowerPoint images. Be aware that legal issues are involved when materials secured by copyright are made public.
Benefits
The ability to use this software to integrate outlines, existing slides, and various materials that previously required separate forms of delivery (e.g., chalkboard, whiteboard, overhead projector, 35mm slide projector) is a major convenience. It is also relatively simple to incorporate audiotapes and video clips. By using a single format, my presentations are more seamless, I am less dependent on the functioning of multiple devices, and I eliminate wasted time and student distraction by not having to shift from one mode to another.
The fact that slides can be easily printed on paper and made available as handouts is often advantageous. A colleague in nutrition uses her full set of lecture slides, which includes elaborate diagrams and images, as the course textbook.
The dynamic and colorful classroom presentations not only help hold student attention during class, but can also be made available to students for subsequent review and study on their personal computers or in student labs.
For instructors, putting lecture materials into a multimedia mode can be a first step to developing stand-alone modules suitable for the Internet, distance learning, and independent studies.
Evaluation
Following a presentation from computer-generated visuals and a more traditional chalkboard presentation, we surveyed the students regarding their preference. Of the 200 respondents, 79% preferred the slide show, 10.5% preferred the more traditional presentation, and the remaining 10.5% expressed no preference. What they liked about the computer-based presentation was the use of visual images, color, the pacing, and the more easily perceived organization. Students reported that visuals were much easier to see than when drawn on chalkboard or presented by overhead projector. The major weakness was a perceived loss of flexibility regarding student/instructor interaction, the same point that was cited as the primary strength of the traditional chalkboard approach.
Drawbacks
The initial time commitment is extensive. I put in about 60 hours over several weeks to prepare my first computer-based lecture (and have spent additional hours on revisions). Much of the initial time, however, was spent on learning the basics of the software and developing an assortment of visual formats and sources to reinforce my lecture topics.
The danger of form overtaking content—one can spend hours tweaking visuals to see how they look in different colors or in different positions on the screen. Just as students become enamored of poorly written papers printed out in beautiful word-processor format, I was smitten at times with attractive slides that said little or nothing. The truth emerged when it came time to write examination questions.
For photographs where sharpness and color quality matter, a 35mm projector provides better resolution than a computer-based image. Scanning 35mm slides also requires special equipment and can be tedious and time-consuming. Photos from a digital camera, however, can be incorporated easily into a PowerPoint presentation.
Reliability of the computer and its display system may be difficult to control. We are still in the early stages of this technology and glitches are commonplace. Connections come loose, lighting may not be appropriate, or programs don’t load. Successful use of computer-based presentations requires a specialized and above-average projection system in the classroom. See Jackson (May 1997) for a discussion of the projector challenge.
Tips
- Minimize the number of words per slide. The visual material should highlight rather than duplicate your lecture.
- Keep slide content simple and easy to absorb at first glance. Try to limit each slide to a single point.
- Don’t get carried away with "eye candy"—fancy fonts, lots of colors, and little icons. Use color meaningfully to show relationships.
- Avoid "chart junk" by keeping figures and graphs clean and simple. See Tufte, E. R. (1990) Envisioning information. Cheshire, CT: Graphics Press.
- Check with your students on your speed in showing slides. (I tend to go too fast).
- Students will try to copy everything down, even if you tell them not to. Provide handouts of slides that contain a lot of detail.
- Don’t make the room too dark. Students like to see the speaker and need sufficient light for taking notes. Choosing a light background for your slides creates considerable ambient light.
- Expect some criticism of your initial fumbling and start-up delays. Students raised on TV and well-crafted videos tend to expect flawless presentations.
- Always have a backup on hand in case the technology fails. Remember Murphy’s Law. A duplicate set of overheads or 35mm slides can fill in smoothly.
- Expect a learning curve. Refining a new approach requires feedback and continued upgrading. If you evaluate your presentations and continue to work on materials and delivery skills, your effectiveness will improve with each repetition.